API
@Kilvoctu的API指南
- 当然,首先是使用
--api命令行参数运行web ui- 您的“webui-user.bat”中的示例:
set COMMANDLINE_ARGS=--api
- 您的“webui-user.bat”中的示例:
- 这启用了可以在http://127.0.0.1:7860/docs(或无论URL是+ /docs)上查看的api。我感兴趣的基本是这两个。让我们只关注
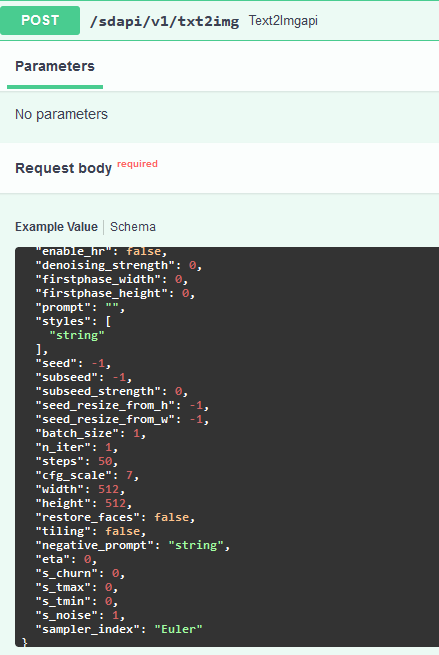
/sdapi/v1/txt2img

- 当您展开该选项卡时,它给出了一个要发送到API的有效负载示例。我经常用这个作为参考。

- 所以这就是后端。API基本上说明了什么是可用的,它要求什么,以及发送到哪里。现在进入前端,我将开始使用我想要的参数构建一个有效负载。一个例子可以是:
payload = {
    "prompt": "maltese puppy",
    "steps": 5
}
我可以在有效载荷中输入我想要的很少或尽可能多的参数。API将对我没有设置的任何内容使用默认值。
- 在那之后,我可以把它发送到API
response = requests.post(url=f'http://127.0.0.1:7860/sdapi/v1/txt2img', json=payload)
同样,此URL需要与web ui的URL匹配。如果我们执行此代码,web ui将根据有效负载生成图像。那太好了,但那又怎样?任何地方都没有图像......
- 后端完成其工作后,API以上面分配的变量发送响应:
response。响应包含三个条目;“图像”、“参数”和“信息”,我必须找到一些方法从这些条目中获取信息。 - 首先,我放了这行
r = response.json(),以便更容易处理响应。 - “图像”是生成的图像,这是我最想要的。没有链接或任何东西;这是一串巨大的随机字符,显然我们必须解码它。我就是这样做的:
for i in r['images']:
    image = Image.open(io.BytesIO(base64.b64decode(i.split(",",1)[0])))
- 有了这一点,我们在
image变量中有一个图像,我们可以使用,例如用image.save('output.png')保存它。 - "parameters" shows what was sent to the API, which could be useful, but what I want in this case is "info". I use it to insert metadata into the image, so I can drop it into web ui PNG Info. For that, I can access the
/sdapi/v1/png-infoAPI. I'll need to feed the image I got above into it.
png_payload = {
        "image": "data:image/png;base64," + i
    }
    response2 = requests.post(url=f'http://127.0.0.1:7860/sdapi/v1/png-info', json=png_payload)
在那之后,我可以获得信息response2.json().get("info")
应该工作的示例代码可以看起来像这样:
import json
import requests
import io
import base64
from PIL import Image, PngImagePlugin

url = "http://127.0.0.1:7860"

payload = {
    "prompt": "puppy dog",
    "steps": 5
}

response = requests.post(url=f'{url}/sdapi/v1/txt2img', json=payload)

r = response.json()

for i in r['images']:
    image = Image.open(io.BytesIO(base64.b64decode(i.split(",",1)[0])))

    png_payload = {
        "image": "data:image/png;base64," + i
    }
    response2 = requests.post(url=f'{url}/sdapi/v1/png-info', json=png_payload)

    pnginfo = PngImagePlugin.PngInfo()
    pnginfo.add_text("parameters", response2.json().get("info"))
    image.save('output.png', pnginfo=pnginfo)
- 进口我需要的东西
- 定义要发送的网址和有效负载
- 通过API将所述有效载荷发送到所述网址
- 在循环中抓取“图像”并解码它
- 对于每张图片,将其发送到png信息API并取回该信息
- 定义一个插件来添加png信息,然后将我定义的png信息添加到其中
- 在这里的末尾,用png信息保存图像
关于"override_settings"的注释。此端点的目的是覆盖单个请求的Web ui设置,例如CLIP跳过。可以传递到此参数的设置在url的/docs中可见。

您可以展开选项卡,API将提供一个列表。有几种方法可以将此值添加到您的有效负载中,但我就是这样做的。我将用“filter_nsfw”和“CLIP_stop_at_last_layers”进行演示。
payload = {
    "prompt": "cirno",
    "steps": 20
}

override_settings = {}
override_settings["filter_nsfw"] = true
override_settings["CLIP_stop_at_last_layers"] = 2

override_payload = {
                "override_settings": override_settings
            }
payload.update(override_payload)
- 拥有正常的有效载荷
- 之后,初始化字典(我称它为“override_settings”,但可能不是最好的名字)
- 然后我可以随心所欲地添加键:值对
- 仅使用此参数制作新的有效负载
- 更新原始有效负载以将这个添加到其中
因此,在这种情况下,当我发送有效载荷时,我应该在20个步骤处获得一个“cirno”,在2个步骤处跳过CLIP,并打开NSFW过滤器。
For certain settings or situations, you may want your changes to stay. For that you can post to the /sdapi/v1/options API endpoint We can use what we learned so far and set up the code easily for this. Here is an example:
url = "http://127.0.0.1:7860"

option_payload = {
    "sd_model_checkpoint": "Anything-V3.0-pruned.ckpt [2700c435]",
    "CLIP_stop_at_last_layers": 2
}

response = requests.post(url=f'{url}/sdapi/v1/options', json=option_payload)
将此有效负载发送到API后,模型应切换到我设置的模型,并将CLIP跳转到2。重复的是,这与“override_settings”不同,因为此更改将持续存在,而“override_settings”适用于单个请求。请注意,如果您要更改sd_model_checkpoint,该值应该是Web ui中显示的检查点的名称。这可以与此API端点一起引用(就像我们引用“选项”API一样)

“标题”(名称和散列)是您想要使用的内容。
这是提交47a44c7
为了更完整地实现前端,如果有人想以它为例,我的Discord机器人就在这里。大多数动作都发生在stablecog.py中。有很多评论解释了每个代码的作用。
本指南可以在讨论页面中找到。
此外,查看webui的python API客户端库:https://github.com/mix1009/sdwebuiapi使用自定义脚本/扩展示例:此处

